2. Installation
Windows™ users can choose between two methods of installing the deviation firmware.
- Use the Deviation Uploader tool
- Use the Walkera DfuSe USB Upgrade tool (Windows™ only)
If you do not have the Windows™ operating system, go with the first choice, the Deviation Uploader tool. It is a Java application that was designed by the Deviation developer team to be efficient and simple to use with any Devo radio and any version of deviation or even Devention, if you should wish to revert to the original Walkera firmware. The Walkera tool uses a two-step approach, in which you first install the firmware, then the filesystem library. The Deviation Uploader tool does the same thing in one simple, convenient step, using the ZIP compressed deviation firmware file as the source.
The Preparation section covers things you need to do before starting an installation. Then, two installation sections cover the actual installation, depending on which tool you are using. There are sections following that include notes specific to upgrading from or to various versions and build types.
2.1. Preparation
First, ensure that your Devo is fully charged before starting the installation. Download the deviation-devoXX-x.y.z.zip firmware from http://deviationtx.com/downloads-new/category/1-deviation-releases where XX is the number of your Walkera Devo™ transmitter. x.y.z identifies the deviation version number.
NOTE: Do NOT attempt to use the DfuSe tool from STMicroelectronics!
You can download the Walkera tool from: https://drive.google.com/drive/u/0/folders/0B6SupsT8-3_BYXNQM1dOUlRYcGM
The Deviation Uploader tool can be downloaded from http://deviationtx.com/downloads-new/category/161-dfu-usb-tool
If you are using Windows™, you need to install the appropriate USB drivers. See the section on Windows Driver Installation
Unzip the tools and install them locally. If you are using the Deviation Uploader tool, it is not necessary to unzip the firmware you downloaded. It is recommended that you test the DFU tool by first upgrading your TX to a different version of Walkera firmware.
If you are upgrading from a previous Deviation release, it is strongly recommended that you back-up the ‘models’ directory from the transmitter as well as the ‘tx.ini’ and the ‘hardware.ini’ files to ensure you don’t lose any model or transmitter configuration.
2.1.1. Windows Driver Installation
The Walkera DfuSe tool and the Deviation Uploader tool use different drivers. Both can be installed by the Deviation USBDrv Installer, available from http://www.deviationtx.com/downloads-new/category/161-dfu-usb-tool
Extract the Deviation USBDrv Installer, and run ‘DFU USBDrv Installer-x.y.exe’. You can then uninstall both drivers, or install either the Deviation USB Driver for use with the Deviation Uploader or the Walkera driver. Install the driver for the Dfu tool you plan on using.
2.2. DFU Installation With Walkera DfuSe
Installation of Deviation with the Walkera DfuSe tool is done in exactly the same manner as upgrading the Walkera Devention firmware. Note that Deviation will NOT overwrite Walkera models stored on the transmitter. While they cannot be accessed by Deviation, they will be safely preserved should the Walkera firmware ever need to be reinstalled
Unzip the firmware file that you downloaded earlier. Plug the transmitter into the PC via USB, and turn on the transmitter while holding ‘EXT’ to enter programming mode. On the Devo12, this is done by holding the trainer switch instead.
Several users have reported compatibility issues with Windows™ and/or USB ports when running this tool. If DfuSe does not recognize your TX, try removing all USB devices and restart your PC with only the USB connection to the TX. Take the steps necessary to resolve any connection issues.
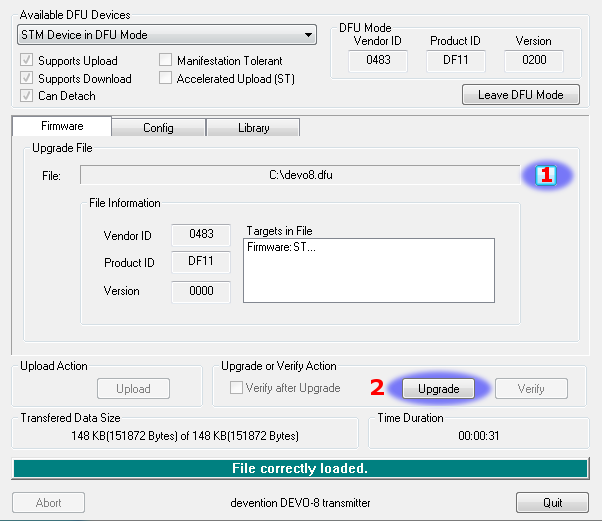
If your transmitter has been connected correctly ‘STM Device in DFU Mode’ will be displayed under ‘Available DFU Devices’. Otherwise this field will remain blank.
- Press the ‘…’ button and select the deviation-devoXX-vx.y.z.dfu file to install.
- Select ‘Upgrade’ to install the firmware. This will be grayed-out if your transmitter is not detected. Do NOT use ‘Upload’ as this will destroy the dfu file on your PC.
- Devo12 Only: Select the ‘Library’ tab, click ‘…’ select the devo12-lib.dfu from the zip file. Then select ‘Upgrade’ again to install the library.
Turn off the transmitter, and turn back on while holding ‘ENT’. There should be a USB logo on the screen. If this is a first-time install of Deviation, the PC should prompt to format a drive. Format using default options. Next, upgrade the file system via USB.
2.3. Upgrading the file system via USB
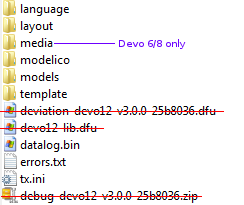
Open the folder that has been extracted from the zip file and copy all the files and directories inside this folder to the root of the transmitter USB drive. For details of the file-system please see USB & File-system. The files with the extension ‘zip’, and ‘dfu’ need not to be copied.
If you are upgrading from an older release, don’t upgrade the ‘tx.ini’, and ‘hardware.ini’ files or the ‘models’ directory. Optionally, copy the ‘models’ directory to the transmitter except for the currently configured model files. This last step will ensure that the defaults for newly created models have the latest options set. If the ‘tx.ini’ file is overwritten, the stick calibration must be repeated and any settings reset.
2.4. DFU Installation with Deviation Uploader
The ‘Deviation Uploader’ is a Java (jar) file. You can either pass the jar file to the Java executable on the command line, or open the file in the GUI, using the Java application to open it. You will need to install Java from http://www.java.com/ if you haven’t already installed it.
Once the ‘Deviation Uploader’ is open, connect your transmitter to a USB port, and then turn it on while holding down the ‘EXT’ button. On the Devo 12, this is done by holding the trainer switch instead.
If everything is working properly, you should see the ‘Transmitter’ change to the type of the connected transmitter. If it changes to the wrong transmitter type, stop now and seek help from the forums. If it doesn’t change, check the system information to see if the device is listed at all. If it shows up as an unknown device on Windows, then check your driver installation and try unplugging all other USB devices. Take the steps necessary to resolve any connection issues.
- Press the ‘…’ button and select the zip file for the firmware you will install. There is no need to unpack the zip file since the Deviation Uploader will handle that.
- If this is an initial install, all the ‘Replace’ boxes, along with ‘Format’ will be preselected.
- Click the ‘Install/Upgrade’ option. Installation will take a few minutes, so be patient. A pop-up dialog box will notify you when installation is completed. You are done.
- Turn off your Devo transmitter. When you turn it on again, you’ll be greeted by the Deviation splash screen.
For transmitters other than the F7 and F12E, turn the transmitter back on while holding ‘ENT’. There should be a USB logo on the screen. If this is a first-time install of Deviation, your computer may prompt to format a drive. Format using default options.
2.5. Upgrading the file system with Deviation Uploader
If you followed the foregoing instructions for installing the deviation firmware ZIP file for your Devo using the Deviation Uploader tool, your installation is complete and no further installations are necessary. If, on the other hand, you unzipped the file and installed the firmware dfu file alone, then your must continue by installing the library dfu file from the same location. There is no advantage in doing the installation this way, but it can be done.
2.6. Deviation 5.0
The long-awaited firmware update from version 4.0.1 to version 5.0 was accomplished on April 30, 2016 and was announce on the DeviationTx website forum. Deviation version 5.0 is the current version and it includes all patches, bug fixes, improvements and protocols of the previous version. Even so, development continues, so new controllers will be added to the support list as well as new protocols and features, when they become available.
2.7. Nightly Deviation Builds
The Nightly builds are versions of Deviation with additional features beyond the Deviation 5.0 release version. The Nightly builds are provided to allow the Deviation community to fully exercise new features so the community can provide feedback and suggestions for improvement. As a user, you recognize that Deviation is a community supported software system, and members of this community can contribute by verifying, validating or commenting on the features that they’ve used. Nightly builds are found at http://www.deviationtx.com/downloads-new/category/13-nightly-builds
These builds are published when new features are added to the Deviation core feature set, when major bugs are corrected and when new hardware support is added. The nightly builds are tested but not to the rigorous extent of a full release. Please read this post! http://www.deviationtx.com/forum/5-news-announcements/1416-nightly-builds
The ONLINE User Manual for Deviation is regularly reviewed and updated to include information about new common features. Additionally, while best efforts are made by the Deviation community to update these User Guides, this documentation MAY NOT fully describe the features of the nightly builds. Any Deviation user with an update or change to the manual can submit additions and changes via the Deviation-manual Github repository’s issue tracker at https://github.com/DeviationTX/deviation-manual/issues , or edit the source of the manual directly.
So should you load the Deviation 5.0 release or should you load a Nightly? Your own requirements will determine the answer to that question. If you use Walkera, Spectrum and Flysky models, and any number of variations of the WLToys V2x2 quads, the Deviation 5.0 release will be sufficient. If you have one of many newer small quads, or if you want support for additional hardware beyond additional transmitter modules, you should consider using the Nightly build.
If you are also adding hardware modifications, such as switches or transmitter modules, you should install the Deviation Nightly build first and review the available features. After Deviation is running, install your hardware and modify any settings to support your modifications. This helps you determine the source of issues later for troubleshooting.
2.8. Test Builds
Test Builds are for experienced users only. The Deviation Test builds are prepared by software developers to test new features or hardware options, and require a higher level of experience. These builds may also require specific transmitter configuration or hardware mods.
Some test builds require that you install the latest Nightly prior to installation. DO NOT INSTALL A TEST BUILD until you read the thread detailing the reason for that build and how to use it, and know why you would want to use it.
Once you install a test build, do add a post to the appropriate thread letting the developer know how things went! That’s why they are created - so developers can get feedback, even if it’s only a note that things worked fine.
2.9. USB & File-system
Deviation stores all configuration, bitmaps, and models as regular files on the USB file-system. USB can be most easily enabled by holding down the ‘ENT’ button while powering up the transmitter. Files can then be easily copied to or from the transmitter.
The directory structure is as follows:
| \tx.ini | Transmitter configuration. Includes trim settings, calibration data, and the last-used model number |
| \hardware.ini | Transmitter hardware setup, describing supported hardware modifications. number |
| \errors.txt | If the firmware crashes or reboots, debug information will be stored in this file |
| \datalog.bin | File for telemetry data |
| \media\config.ini | The color scheme and fonts for the transmitter |
| \media\sound.ini | Contains notes to play for various alarms |
| \media\*.bmp | Images used for the current transmitter theme |
| \media\*.fon | Font files |
| \models\default.ini | The default model, loaded whenever a model is cleared |
| \models\model*.ini | Configuration files for each model. Due to a limitation in the firmware, deviation cannot create new files. It is therefore necessary to have a modelxx.ini for each model regardless of whether it is currently in use. |
| \modelico\*.bmp | All available model icons (96x96 pixels is recommended but not required). Model icons must be saved as 16-bit BMP files in either RGB565 (non-transparent) or ARGB1555 (transparent) format. |
| \templates\*.ini | Configuration files used when loading predefined templates. These are nearly identical to the model configuration files, however they do not necessarily define all parameters |
| \language\lang*.* | Language translation files. These are UTF-8 text files containing the English string and the respective translated string. |
Note: Deviation only supports 8.3 style file names. That means file names should be no larger than ‘xxxxxxxx.yyy’**