11. 高级内容
11.1. 教练模式设置
Deviation 可以通过教练模式设置被用来作为教练(主)或学生(从)遥控 器。在这种模式下,教练和学生通过 DSC 端口用教练线把各自的遥控器连接到 一起。教练的遥控器将与模型实际通信,但教练可以通过一个开关,让学生来控 制模型。当开关打开,学生的遥控器的输入(摇杆)信息通过教练线发送到教练 的遥控器然后替换教练的摇杆信息。
Deviation 实际上可以与任何遥控器设置为主或从模式。Deviation 匹配不同制 造商的遥控器需要知道配对遥控器的 PPM参数,并正确配置“中点脉宽”和 “脉宽变化”,以及知道发送几个通道,通道的顺序。
11.1.1. 主模式
主模式是在“PPM In”选择框中选择“通道”或“Stick”设置的,详情参照:ref:model-setup。在“Stick”或“通道”上按“ENT”键将显“Trainer Cfg”页面。该 2 种模式的功能稍有不同:
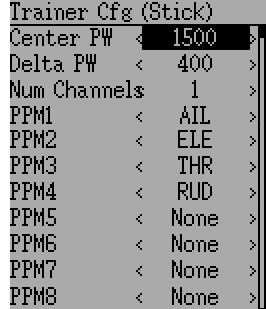
Stick模式:在 Stick模式下,每个输入通道映射到在主遥控器的摇杆。在这个模式 下,如果教练移动摇杆,学生的摇杆将被教练接管。通常使用此模式时,学生的遥控器将只确定摇杆的位置(没有混控)但教练的遥控器将设置一切必要的混控。
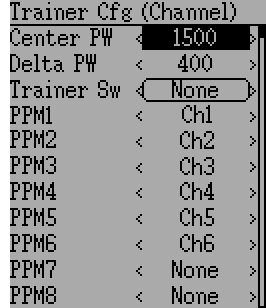
通道模式:在通道模式中,每个输入信道映射到主遥控器的输出信道。在这种模式下,学生的遥控器应该设置一切必要的混控。必须注意,要确保教师和学生遥控器配置相同,否则,教师和学生控制之间进行切换时,模型可能无法做出反应。
两个页面共同的配置选项:
- 中点脉宽:定义学生遥控器发射代表舵机中心位置的脉冲时间(微秒)。如果这个数字和学生遥控器不匹配,舵机不会回中。
- 脉宽变化:定义学生遥控器发射代表舵机最大位置的脉冲宽度(从中心测量)。如果该值不正确,舵机不会满舵(或摆动太大)。
- 教练开关:定义让学生遥控器控制的开关。
- PPM1 ... PPM8:定义从学生遥控器到教练遥控器的映射(频道或输入)
11.1.2. 从模式
Slave mode is configured by choosing ‘PPM’ as the protocol in section 模型设置. Pressing ‘ENT’ on the Protocol spin-box will enable setting the output options. See section 协议:USBHID for configuration. Note that Deviation will send the channel output data through the PPM. To use a Deviation slave transmitter with a Deviation Master configured for ‘Stick’ mode (see above), there should be no mixing done in the slave transmitter.
11.2. 配置FPV或者其他外部输入
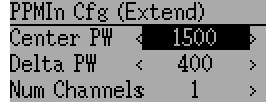
Deviation可以接受外部的PPM输入型号(比如FPV头追)。首先需要参考:ref:`model-setup`配置PPM IN模式。
当打开以后,在PPMIN模式下按ENT键来配置额外的输入。
配置选项:
- 中点脉宽:定义学生遥控器发射代表舵机中心位置的脉冲时间(微秒)。
- 脉宽变化:定义学生遥控器发射代表舵机最大位置的脉冲宽度(从中心测量)
- 通道数:设置有几个输入的通道(一般不超过8个)。
11.3. Using a Trim as a Virtual Switch
Deviation has the capability to create virtual switches to supplement the mechanical switches of the transmitter. This capability is only available when using the Advanced GUI. There are 3 types of switches available:
- Momentary: The switch will be active only as long as the trim button is held
- Toggle: The switch will toggle from on-to-off or off-to-on each time the trim button is pressed
- On/Off: The Trim+ button will turn the switch on, and the 'Trim-' button will turn it off-to-on
- 3 Pos: The switch will be active in one direction as long as the Trim+ button is held, and in the other direction as long as the Trim- button is held, returning to center when released.
To setup a virtual switch, start by selecting the trim from the 'Trim' page, and entering the trim-setup page. See 微调和虚拟输入
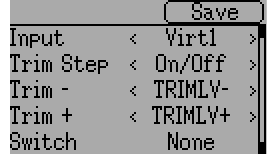
Next set the 'Trim Step' field to 'Momentary', 'Toggle', 'On/Off' or '3 Pos'. This is done by pressing the left-arrow on the 'Trim Step' spin-box until the value is less-than 0.1 Second select the 'Input' to be the virtual channel to convert to a switch (we'll use 'Virt1')

Now go to the 'Mixer' page, and enter the configuration for the specified Virtual Channel (Virt1 in our example)
Set the mixer-type to 'Complex', set the 'src' to the current virtual channel ('Virt1'), set the curve to '1-to-1' (Do NOT use 'Fixed'), set the scale to '0', and finally enable the 'Trim' button.
You can now use the virtual channel ('Virt1') like any other switch input. When the virtual switch is active, the virtual channel will have a value of 100, otherwise it will have a value of -100. In the case of '3 Pos', virtual channel will have a value of -100 when trim is pressed in one direction, +100 when pressed in the other direction, otherwise it will have a value of 0.
Note: If you use the virtual channel as a 'Src' (as opposed to a 'Switch') make sure that 'trim' is disabled for that mixer, otherwise the trim will be applied twice.
11.4. Swash Mixing
A swash-plate is used to control flight on an RC helicopter. The swash-plate controls the plane of rotation of the main-rotor as well as the blade pitch. A swash plate is normally connected to 3 servos known as Elevator, Aileron, and Collective, but due to its design, there is not a 1-to-1 correspondence between stick-movement and the servo movement. Instead some mixing is necessary between the throttle, elevator and aileron sticks and the swash-plate servos. This mixing is known as cyclic Collective Pitch Mixing (CCMP).
Traditionally, RC helicopters have used a flybar above or below the main rotor attached to a series of linkages to maintain stability. In these setups, the transmitter will normally do all of the mixing, and directly drive each of the 3 swash-plate servos. This configuration is known as manual-CCPM (mCCPM). Alternatively, an electronic mixer can be included on the helicopter either as part of the receiver, or between the receiver and servos, that can implement the proper mixing. This configuration is known as electronic CCPM (eCCPM) and in this case, the transmitter directly supplies aileron, elevator, and collective inputs, and the electronic mixer will convert the signals into appropriate swash-plate servo motion.
Recently, flybarless (FBL) helicopters have become more common, especially in the micro size range. These helicopters use an eCCPM system along with an electronic gyroscope to continuously adjust the swash-plate to maintain stability without the need for a physical flybar. This setup tends to be less expensive to manufacture, and also provides better stability and more precise control.
Deviation provides control for several swash-plate layouts, these include: 120°, 120° Alternate, 140°, 90°, and None. Each of these options are illustrated below:
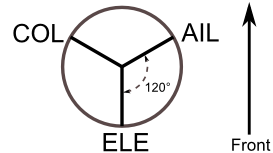
120 (3 Servo): Servos are placed around the swash-plate at 120° intervals. With Aileron input, the aileron and pitch servos tilt the swash-plate left and right; with Elevator input, the three servos tilt the swash-plate fore and aft; with Pitch input, all three servos raise the swash-plate up and down. Servos working in unison dramatically increases the torque available as well as the precision and centering.
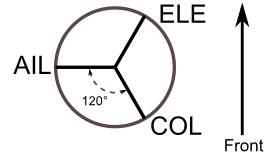
120X (3 Servo): Same as the above layout except servos are shifted 150°. With Aileron input, the three servos tilt the swash-plate left and right; with Elevator input, the elevator and pitch servos tilt the swash-plate fore and aft; with Pitch input, all three servos raise the swash-plate up and down.
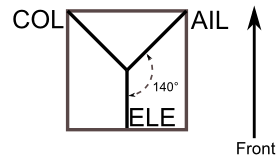
140 (3 Servo): Fundamentally, the servo operations of 140° swash-plates are almost the same as 120° swash-plates. However, the servo arrangement for elevator operation differs. 140° swash-plate CCPM offers smoother operation of the combined servos and an equal cyclic rate all around. On a 120° setup, the left/right cyclic is slightly faster than the fore/aft cyclic.
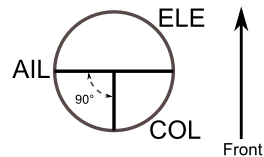
90 (3 Servo): With Aileron input, the aileron and pitch servos tilt the swash-plate left and right; with elevator input, the servos tilt the swash-plate fore and aft; with Pitch input, all three servos raise the swash-plate up and down. Most commonly used for electronic helicopters.
None: This is a special case where all mixing is done on-board the helicopter using a gyroscopic flight control system. Please refer to the specific manufacturers instructions to see how to configure mixer outputs.
Note: Some helicopters are 120 or 140, except rotated 180 degrees. In these cases you will still use the designated swash-plate type but may need to reverse specific channels.
11.5. Modifying sounds
You can edit the sounds your Devo makes, though you have to do it by mounting the transmitter as a USB drive and editing the 'sound.ini' file in the 'media' folder.
The sections, and what causes them to play, are:
- startup: Powered on.
- shutdown: Powering off.
- volume: Configuring transmitter volume.
- timer_warning: Timer is about to expire.
- alarm#: Timer # (1 to 4) has expired.
- batt_alarm: Battery low warning.
- done_binding: Binding finished.
- key_pressing: On a key press
- saving: When saving a model file.
- max_len: When you've exceeded the length of a string in the keyboard.
- telem_alarm#: Telemetry alarm # (1 to 6) has triggered.
In each section, you can adjust set 'volume' from 0 (off) to 100 (max). The rest of the entries are note names, and the value is the number of milliseconds to play that note. There is a limit of 100 notes for each sound.
The note names are 'xx', which is a rest (no sound played). You can then pick a note ('a'-'g'), possibly sharped by adding a 'x' if it's 'a', 'c', 'd', 'f' or 'g'. Finally, you can choose an octave with a single digit, ranging from '0' to '4'. Those take you from 'c0' (middle C) up to 'b4'. In addition, 'a', 'ax' and 'b' will play the three notes below middle C.