
Adding switches to devo 6s
- mwm
-
- Offline
Less
More
09 Jan 2016 03:32 #41542
by mwm
Do not ask me questions via PM. Ask in the forums, where I'll answer if I can.
My remotely piloted vehicle ("drone") is a yacht.
Replied by mwm on topic Adding switches to devo 6s
Final update. I've merged the changes now that they've been reviewed (thanks hexfet!). Any nightly builds or test builds from me after 2015 should include them.
Do not ask me questions via PM. Ask in the forums, where I'll answer if I can.
My remotely piloted vehicle ("drone") is a yacht.
- RoGuE_StreaK
-
- Offline
Less
More
- Posts: 486
09 Jan 2016 03:47 #41543
by RoGuE_StreaK
Replied by RoGuE_StreaK on topic Adding switches to devo 6s
Thanks Mike, sorry about the lack of testing  still haven't gotten around to pulling apart my TX again; having a 3wk old is kinda chewing up most of my free time
 ")
- mwm
-
- Offline
31 Jan 2016 04:47 #42450
by mwm
Do not ask me questions via PM. Ask in the forums, where I'll answer if I can.
My remotely piloted vehicle ("drone") is a yacht.
Replied by mwm on topic Adding switches to devo 6s
Can someone who has awarded this hardware do some tests for me? I think the merger code has an off by one error in the button input code, so that the wrong buttons are being ignored. So could you try enabling just one button in hardware.ini,and see if that works properly? I suspect it'll never be seen as input. In particular, I think trim-right-up being ignored actually ignores the L- button.
More info at deviationtx.com/forum/3-feedback-questio...-of-latest-nightlies
More info at deviationtx.com/forum/3-feedback-questio...-of-latest-nightlies
Do not ask me questions via PM. Ask in the forums, where I'll answer if I can.
My remotely piloted vehicle ("drone") is a yacht.
- RoGuE_StreaK
-
- Offline
Less
More
- Posts: 486
03 Feb 2016 00:56 #42537
by RoGuE_StreaK
Replied by RoGuE_StreaK on topic Adding switches to devo 6s
Sorry for the delay Mike; I assume this is intended for someone who's got the physical buttons/switches in place? I still haven't gotten mine wired up, after much deliberation and testing I finally got around to drilling the holes yesterday but am still deliberating on how to solder it all up in a detachable manner; switches are on the back cover, similar to Deal57's but using toggles for all rather than buttons. Unfortunately my I've have big supply issues with momentary toggles, they turn up as non-momentary, then the replacements are double-pole and hence double-width...
I might try to hard-solder temporarily when I get to it (possibly tonight, but not likely), using the non-momentary switches. What exactly is the behaviour I need to look for? If nothing edited the "L" button doesn't work, and if "extra-buttons=trim-right-up" is added the "L" button will work but the "trim-right-up" won't actually respond? If all new trims are added what's the postulated behaviour?
I might try to hard-solder temporarily when I get to it (possibly tonight, but not likely), using the non-momentary switches. What exactly is the behaviour I need to look for? If nothing edited the "L" button doesn't work, and if "extra-buttons=trim-right-up" is added the "L" button will work but the "trim-right-up" won't actually respond? If all new trims are added what's the postulated behaviour?
- Deal57
-
- Offline
Less
More
- Posts: 857
04 Feb 2016 02:39 #42558
by Deal57
Deviation Devo7e 3way switch mod, A7105, NRF24L01
Devo6s 2x2 switch mod, trim mod, haptic, multimodule, A7105, NRF24L01, CC2500
Devo12e 4-in-1 with voice mod -- it speaks!!
Replied by Deal57 on topic Adding switches to devo 6s
Sorry, I have just returned from a long trip so I haven't done any software testing. I'll probably work on that over the weekend.
Deviation Devo7e 3way switch mod, A7105, NRF24L01
Devo6s 2x2 switch mod, trim mod, haptic, multimodule, A7105, NRF24L01, CC2500
Devo12e 4-in-1 with voice mod -- it speaks!!
- mwm
-
- Offline
04 Feb 2016 05:56 #42562
by mwm
Do not ask me questions via PM. Ask in the forums, where I'll answer if I can.
My remotely piloted vehicle ("drone") is a yacht.
Replied by mwm on topic Adding switches to devo 6s
Internally, the software keeps a list of buttons to ignore. I believe the test in the current build is off by one. If all the the buttons are enabled, nothing is ignored, so everything works. But if you don't add any extra buttons - so that it ignores all the "new" buttons - the L button is incorrectly ignored. If you enable the "trim-right-up" button - so that it is no longer ignored - the L button will start working, but as you said, the trim-right-up button won't work because it's still being ignored.
Basically, the idea is to test various combinations of enabled buttons and see which ones work and which don't. I suspect that you'll need to enable pairs of buttons to get one to work - one to enable the UI features to let you use the button, and a second - incorrect - one to not ignore that input so it actually goes on. I don't think this affects the extra switches, as that code mostly came from the 7E version, but testing that would be good as well.
If you follow the link to the other thread, there's a proposed fix (one line of code) if you can build your own firmware. I'm still not able to sit at my desktop to do that .
.
Basically, the idea is to test various combinations of enabled buttons and see which ones work and which don't. I suspect that you'll need to enable pairs of buttons to get one to work - one to enable the UI features to let you use the button, and a second - incorrect - one to not ignore that input so it actually goes on. I don't think this affects the extra switches, as that code mostly came from the 7E version, but testing that would be good as well.
If you follow the link to the other thread, there's a proposed fix (one line of code) if you can build your own firmware. I'm still not able to sit at my desktop to do that
Do not ask me questions via PM. Ask in the forums, where I'll answer if I can.
My remotely piloted vehicle ("drone") is a yacht.
- mwm
-
- Offline
07 Feb 2016 00:54 #42701
by mwm
Do not ask me questions via PM. Ask in the forums, where I'll answer if I can.
My remotely piloted vehicle ("drone") is a yacht.
Replied by mwm on topic Adding switches to devo 6s
I just merged the fix for the button issue into the nightly build. I know it works with no extra inputs, and figured that's most of the users. If I broke it for those of you who have inputs, please berate me here.
Do not ask me questions via PM. Ask in the forums, where I'll answer if I can.
My remotely piloted vehicle ("drone") is a yacht.
- RoGuE_StreaK
-
- Offline
Less
More
- Posts: 486
08 Feb 2016 23:41 #42809
by RoGuE_StreaK
Replied by RoGuE_StreaK on topic Adding switches to devo 6s
Thanks Mike, finally gotten around to installing my switches and the firmware; haven't tested the preceding version yet to see if the issue was as described, and have only tested the settings with all trims and the 2x2 enabled. Pics / build log to come.
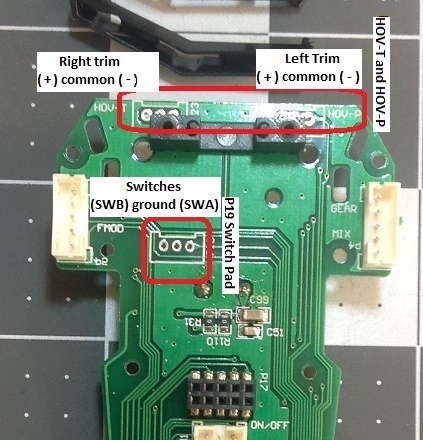
One thing I noticed that I think we need to discuss and agree on is which button/switch name phyisically connects up to which pad. From my brief test, the resulting names don't seem to make much sense compared to their physical pad locations. I had Deal57's build pics to go on, so knew that SwitchA and SwitchB are kinda reverse of what I would have expected, with the "B" pad on the left when observed from the front and the "A" pad on the right, but no biggie; I wired them up as that and they work as expected, "A" is on my left, "B" on my right. But the trims are more troublesome, it turns out that "Left" is on the right side of the PCB (from the front) and "Right" is on the left side! Also Deal57's pics indicated that the "+" pads should be the two central pads, whereas when hooked up the "Right" trim is the opposite; I know that there's been nothing agreed on, so just trying to get a standard established from the start before either I rewire to suit the current layout, or the coding is changed to suit whichever standard is agreed on.
On a side note, I think the comments in hardware.ini could probably be expanded on; I couldn't find anything in the manual, and it's not "obvious" what, for example, the terms "3x2, 3x1, 2x2" mean. Perhaps a simple parenthesis after each, eg. "(two 3-way switches)", "(one three-way switch)", "(two two-way switches)"?
Anyway, thanks again for your tireless and awesome work!
- Deal57
-
- Offline
Less
More
- Posts: 857
09 Feb 2016 00:43 #42810
by Deal57
Deviation Devo7e 3way switch mod, A7105, NRF24L01
Devo6s 2x2 switch mod, trim mod, haptic, multimodule, A7105, NRF24L01, CC2500
Devo12e 4-in-1 with voice mod -- it speaks!!
Replied by Deal57 on topic Adding switches to devo 6s
Your observations are correct, given the functionality that we both have. From the front of the transmitter, the "SWA" is on the left and "SWB" on the right. I suspect you're correct on the wire pad breakout as well. I plan to open the 6S this week, so I need to review and confirm my drawings and notes to ensure that I've posted the most accurate photos or drawings.
Deviation Devo7e 3way switch mod, A7105, NRF24L01
Devo6s 2x2 switch mod, trim mod, haptic, multimodule, A7105, NRF24L01, CC2500
Devo12e 4-in-1 with voice mod -- it speaks!!
- RoGuE_StreaK
-
- Offline
Less
More
- Posts: 486
09 Feb 2016 01:29 - 09 Feb 2016 01:46 #42813
by RoGuE_StreaK
Replied by RoGuE_StreaK on topic Adding switches to devo 6s
(wow, the only time ever when MS Office clipboard has come in handy! completely lost my post when uploading...)
P19 doesn't bother me as long as we document which pad is associated with which switch; it's three pads close together, so doesn't matter which switch wire goes left and which goes right.
However, it makes sense to me that, if possible, wires coming from the left-hand side of the PCB (when looking from the front) shouldn't have to criss-cross over to the right-hand side of the body in order to correlate with the naming convention.
Again, with the "+" and "-" pads of the trims it doesn't really bother me which is which but we have to agree on a standard and document it. My intended setup was to have the "+" happen when pulling forward, "-" happen when pushing back; in my case, the red and blue wires were intended to correlate to the "+", yellow and green to the "-", but Trim_R (left pads, aka "Hov-T") didn't work out this way.
On a side note; Mike, is there any issues with keeping one of the trims held closed? My trim toggles are currently latching rather than momentary (incorrectly supplied), which isn't my intention, but theoretically they could be turned into 3-way switches from a virtual channel if there are no adverse effects?
When I get around to it I'll post exact details of my setup; drill sizes and locations, detachment plug details, hardware meshing conflicts, etc...
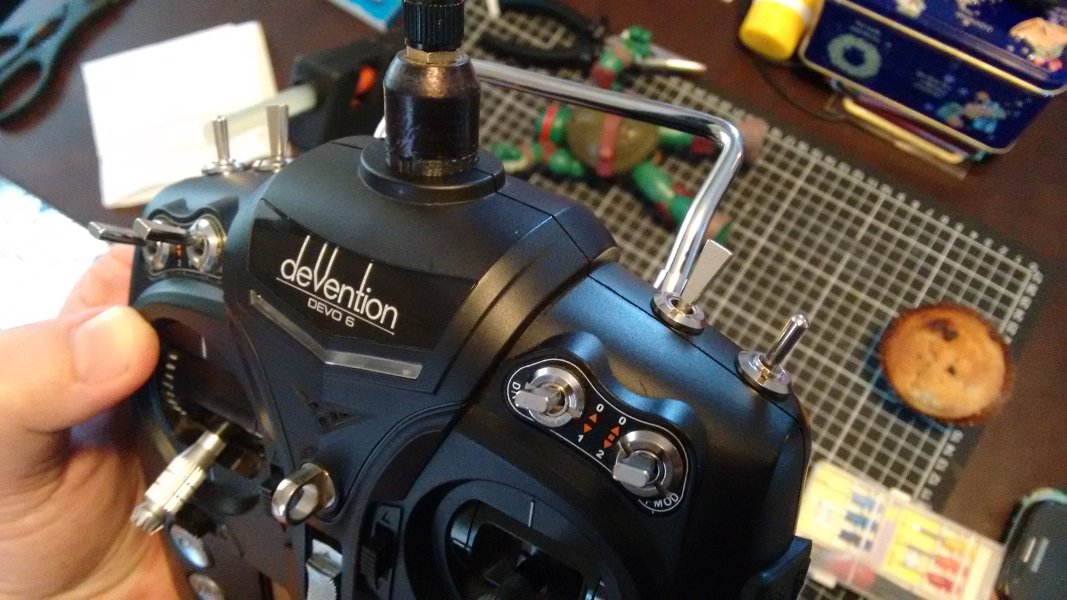
Oh yeah, the "inner" flat-bladed switches are SwitchA and SwitchB, the shoulder-mounts are the trim buttons
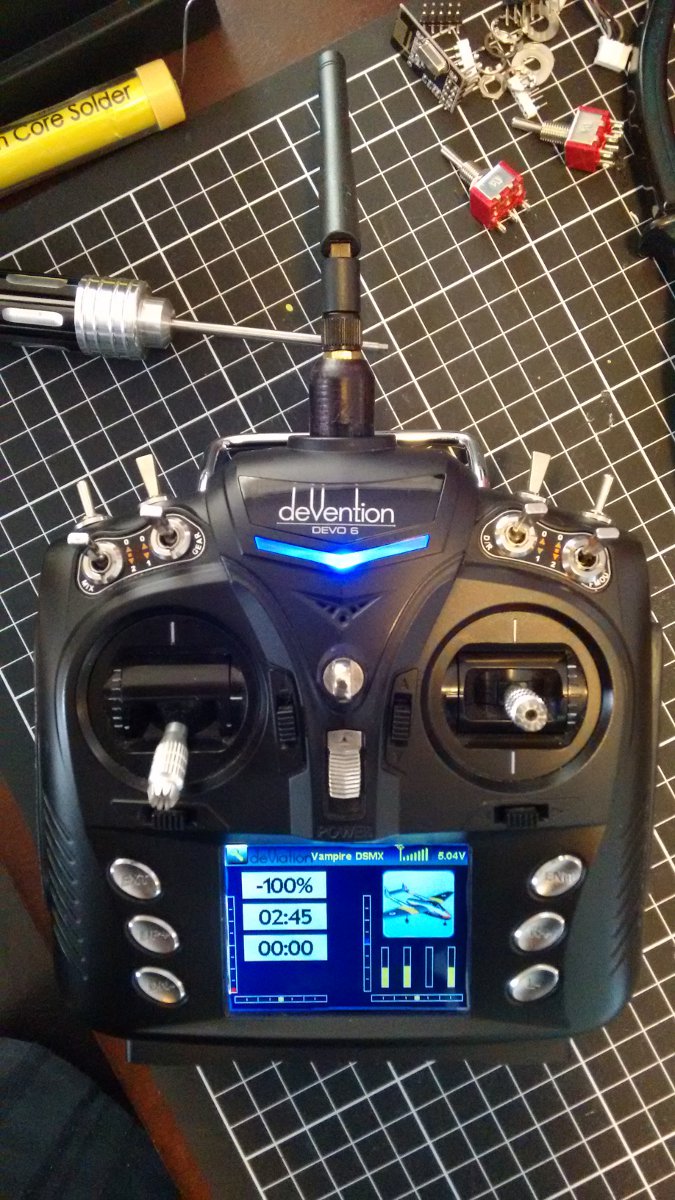
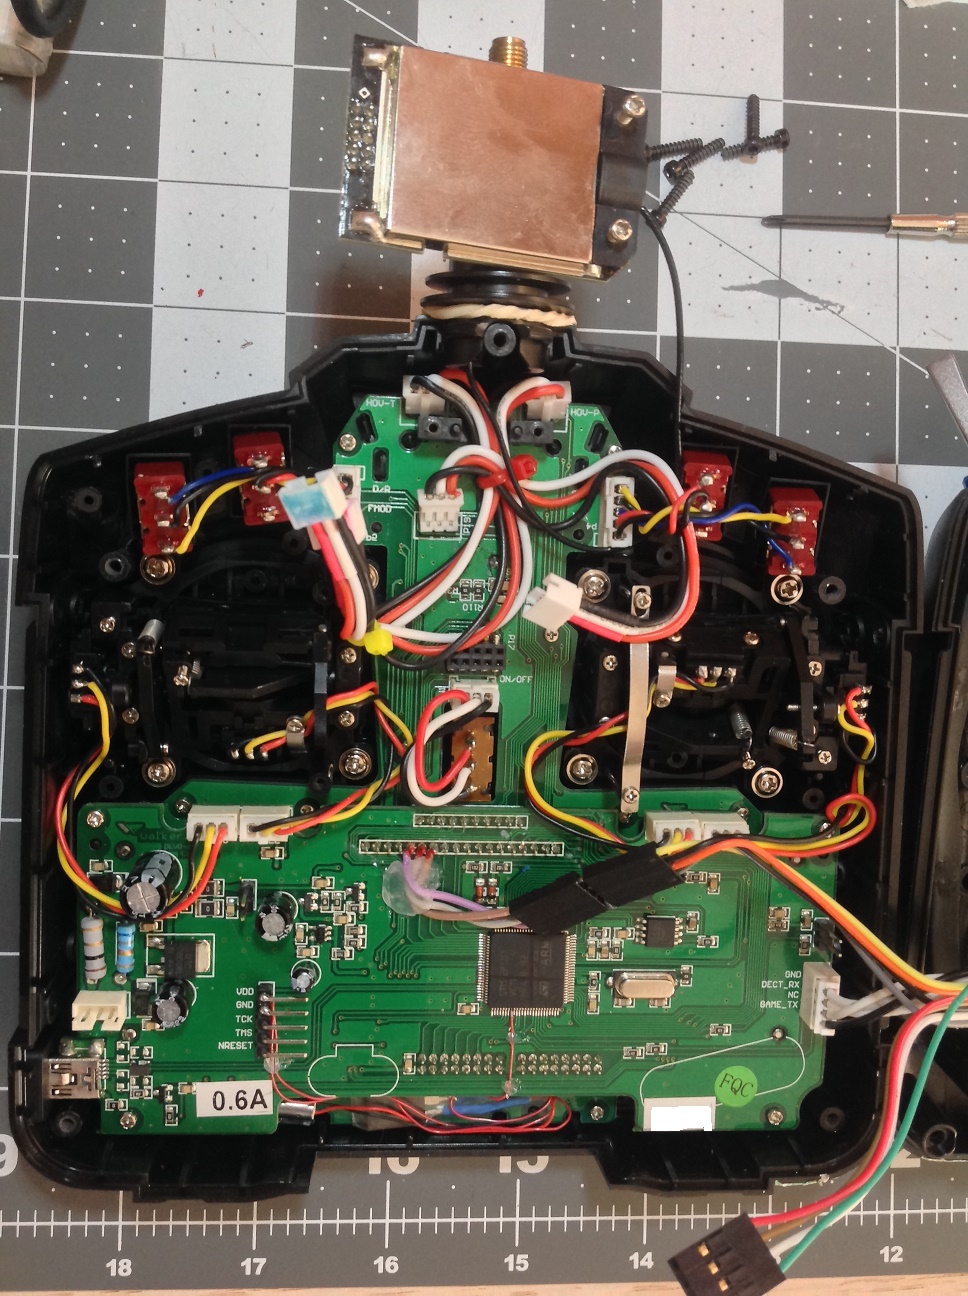
"Final" product
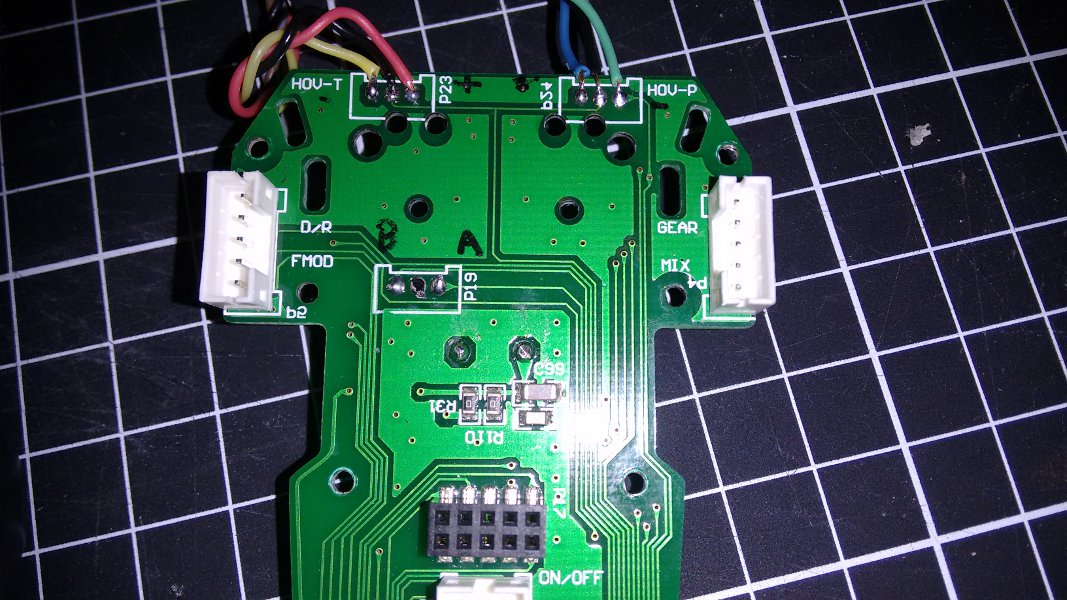
PCB; P19 soldered from underneath, Hov-P and Hov-T from above, hot-melt glue added later for insulation
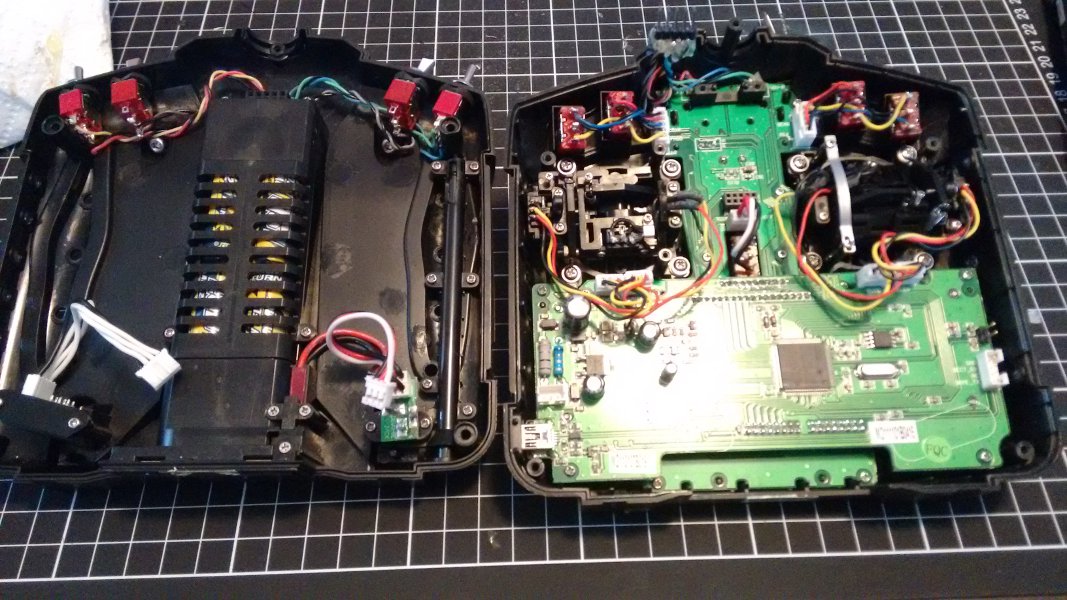
Front and back shell, detachable cable. VERY precise meshing between the front and back switches
With it's unmodified little brother
P19 doesn't bother me as long as we document which pad is associated with which switch; it's three pads close together, so doesn't matter which switch wire goes left and which goes right.
However, it makes sense to me that, if possible, wires coming from the left-hand side of the PCB (when looking from the front) shouldn't have to criss-cross over to the right-hand side of the body in order to correlate with the naming convention.
Again, with the "+" and "-" pads of the trims it doesn't really bother me which is which but we have to agree on a standard and document it. My intended setup was to have the "+" happen when pulling forward, "-" happen when pushing back; in my case, the red and blue wires were intended to correlate to the "+", yellow and green to the "-", but Trim_R (left pads, aka "Hov-T") didn't work out this way.
On a side note; Mike, is there any issues with keeping one of the trims held closed? My trim toggles are currently latching rather than momentary (incorrectly supplied), which isn't my intention, but theoretically they could be turned into 3-way switches from a virtual channel if there are no adverse effects?
When I get around to it I'll post exact details of my setup; drill sizes and locations, detachment plug details, hardware meshing conflicts, etc...
Oh yeah, the "inner" flat-bladed switches are SwitchA and SwitchB, the shoulder-mounts are the trim buttons
"Final" product
PCB; P19 soldered from underneath, Hov-P and Hov-T from above, hot-melt glue added later for insulation
Front and back shell, detachable cable. VERY precise meshing between the front and back switches
With it's unmodified little brother
Last edit: 09 Feb 2016 01:46 by RoGuE_StreaK. Reason: attachments crashed
- mwm
-
- Offline
09 Feb 2016 02:36 #42816
by mwm
Do not ask me questions via PM. Ask in the forums, where I'll answer if I can.
My remotely piloted vehicle ("drone") is a yacht.
Replied by mwm on topic Adding switches to devo 6s
Once we get all the testing done, just send me a list of what each name currently is and what it should be, and I'll fix them that way.
But I'd like to get the extra switches tested before I push that change. If you've got all the inputs installed, then testing should be a matter of trying each configuration option and verifying that it
properly enables the correct input and only the correct input.
Shouldn't be an issue with keeping a button on. That's what the 7e extra switches do, as those are actually on button inputs.
Do not ask me questions via PM. Ask in the forums, where I'll answer if I can.
My remotely piloted vehicle ("drone") is a yacht.
- RoGuE_StreaK
-
- Offline
Less
More
- Posts: 486
09 Feb 2016 03:54 - 09 Feb 2016 03:56 #42820
by RoGuE_StreaK
Replied by RoGuE_StreaK on topic Adding switches to devo 6s
Just gone and done some testing, not every single possible combination but pretty close! Made sure to check functionality of all standard buttons and trims in each case.
Tested (blank line denotes new test):
none
extra-switches=2x2
extra-buttons=trim-all
extra-buttons=trim-all
extra-buttons=trim-left-both
extra-buttons=trim-left-up
extra-buttons=trim-left-down
extra-buttons=trim-right-both
extra-buttons=trim-right-up
extra-buttons=trim-right-down
extra-buttons=trim-left-up
extra-buttons=trim-right-down
extra-buttons=trim-left-down
extra-buttons=trim-right-up
extra-buttons=trim-left-both
extra-buttons=trim-right-up
extra-switches=2x1 (no result)
extra-buttons=trim-left-both
extra-buttons=trim-right-both
extra-switches=3x1
extra-buttons=trim-all
I have two two-ways installed, but I believe I tested this correctly; A off and B on = SWA0, A on and B on (should never happen?) gives SWA1, A off and B off is giving nothing, shouldn't THIS give SWA1? Then A on and B off gives SWA2
RE: trim names, here's my suggestion, to suit the physical layout if you take the central pads to both be "+"
trim_r+ should be trim_l-
trim_r- should be trim_l+
trim_l+ should be trim_r+
trim_l- should be trim_r-
Last edit: 09 Feb 2016 03:56 by RoGuE_StreaK.
- Deal57
-
- Offline
Less
More
- Posts: 857
10 Feb 2016 02:41 #42905
by Deal57
Deviation Devo7e 3way switch mod, A7105, NRF24L01
Devo6s 2x2 switch mod, trim mod, haptic, multimodule, A7105, NRF24L01, CC2500
Devo12e 4-in-1 with voice mod -- it speaks!!
Replied by Deal57 on topic Adding switches to devo 6s
Set extra-switches=2x2 and everything is fine with the world.
The wiring I am using is giving me the results I need: SWA is located on the Left shoulder, position 0 toward the back of the tx. Likewise, SWB is located on the right shoulder, position 0 is toward the back of the tx. So the labeling in this version deviation-devo6-v4.0.1-667678f is exactly as expected.
I tested all of the switch settings and they didn't fail even one time. I tested almost all of the button settings and for some reason, it rebooted occasionally after dismounting the updated USB drive. I didn't lose any data or require a reformat because I saved the file first, then dismounted the USB, then rebooted each time. Where there are no comments the test performed as expected.
=====
extra-switches=3x1
extra-buttons=trim-all
I have two two-ways installed, and got what I think is the desired result. Please correct me if I'm wrong, but as I understand it, when the switch is closed it shorts to ground, so CPU sees a LOW value which is INTERPRETED as ON.
A off and B on = SWA0 - makes sense because A is the desired 0 position
A on and B on gives SWA1 - makes sense now because neither line is grounded, and a 3-way switch would be centered (not connected to either lead)
A off and B off is giving me both SWA0 and SWA2. - well, not exactly what we want but perfectly logical, and this won't happen with a real 3-way switch
A on and B off gives SWA2 - makes sense because B is the desired 0 position.
=====
extra-switches=3x2
extra-buttons=trim-all
no indication of any SWA or SWB
=====
Reset to extra-switches=2x2
Tested the variations of the extra-buttons options. I tested nearly all of them and occasionally experienced a reset when I pressed 'Ent' to turn off the USB support (after fully writing and un-mounting on the PC of course).
++++++
extra-buttons-trim-left-all
started the USB from the menu, edited the hardware.ini to extra-buttons=trim-left-all, saved and closed hardware.ini to the drive, unmounted USB, pressed 'Ent' and devo rebooted.
It sees both left trims.
extra-buttons-trim-right-all
started the USB from the menu, edited the hardware.ini to extra-buttons=trim-right-all, saved and closed hardware.ini to the drive, unmounted USB, pressed 'Ent' and devo stayed on, still sees left trims. Rebooted.
Now It sees both right trims.
++++++
extra-buttons-trim-left-up
started the USB from the menu, edited the hardware.ini to extra-buttons=trim-left-up, saved and closed hardware.ini to the drive, unmounted USB, pressed 'Ent' and devo stayed on, reboot..
Now It sees both left up trim.
extra-buttons-trim-right-up
started the USB from the menu, edited the hardware.ini to extra-buttons=trim-right-up, saved and closed hardware.ini to the drive, unmounted USB, pressed 'Ent' and devo stayed on, reboot..
Now It sees both right up trim.
extra-buttons-trim-left-up
extra-buttons-trim-right-down
started the USB from the menu, edited the hardware.ini to extra-buttons=trim-left-up and extra-buttons-trim-right-down, saved and closed hardware.ini to the drive, unmounted USB, pressed 'Ent' and devo rebooted.
It sees both left up trim and right down trim.
repeated above and it didn't reboot automatically.
++++++
extra-buttons-trim-left-down
extra-buttons-trim-right-up
started the USB from the menu, edited the hardware.ini to extra-buttons=trim-left-down and extra-buttons-trim-right-up, saved and closed hardware.ini to the drive, unmounted USB, pressed 'Ent' and devo didn't reboot. Rebooted.
It sees both left up trim and right down trim.
++++++
So it looks good to me, too. I'll disassemble my tx and get those wires looked at next.
Deviation Devo7e 3way switch mod, A7105, NRF24L01
Devo6s 2x2 switch mod, trim mod, haptic, multimodule, A7105, NRF24L01, CC2500
Devo12e 4-in-1 with voice mod -- it speaks!!
- mwm
-
- Offline
10 Feb 2016 05:16 #42910
by mwm
Do not ask me questions via PM. Ask in the forums, where I'll answer if I can.
My remotely piloted vehicle ("drone") is a yacht.
Replied by mwm on topic Adding switches to devo 6s
The, USB cord is currently being reviewed, and was recently patched. But we don't reload hardware.ini after turning USB, so you needing to reboot is expected.
On the A and B both off, what exactly do wer want? Since it's not possible with a 3-way switch, is there some standard for ⁴-way switches that would make sense here? Probably not going into this change, but if I ever do the configurable switches thing, it would fit well in that.
Is everyone satisfied with RS's trim switch name changes?
Do not ask me questions via PM. Ask in the forums, where I'll answer if I can.
My remotely piloted vehicle ("drone") is a yacht.
- RoGuE_StreaK
-
- Offline
Less
More
- Posts: 486
10 Feb 2016 05:40 - 10 Feb 2016 05:43 #42915
by RoGuE_StreaK
Replied by RoGuE_StreaK on topic Adding switches to devo 6s
Deal57, can you confirm which switches you wired up where, and what their names resulted in for you? Did you wire up as per your photo
here
, and if so do the switches/buttons correlate to your labels?
Mike, were there any changes made to the nightly RE this from the 7/2 buid to the 9/2 build? I'm running 7/2, Deal's running 9/2, so just checking we are seeing the same thing.
RE: 3-way, it's my understanding and testing that in the centre position nothing is connected electrically, and that in the "0" and "2" positions it connects to either the SWA pad or the SWB pad. So to my way of thinking, if tested with 2x 2-ways, the "1" (central) should correlate to neither switch being closed; in their 2-way guise this would be SWA0 and SWB0.
Here's how I see the 2x 2-way positions vs how a 3-way should react:
SWA1 + SWB0 = SWA0
SWA0 + SWB0 = SWA1
SWA0 + SWB1 = SWA2
but I seemed to get
SWA0 + SWB0 = SWA0+SWA2
SWA1 + SWB1 = SWA1 (physically impossible for a 3-way)
Searching ebay etc for 3-way switches you'll see them listed as "on-off-on", meaning the two side positions close contacts but the central position doesn't close anything. This is how I've found TX hardware to be. Note however that you can get "on-on-on" 3-ways, where the central position closes both contacts; these are used for example in electric guitars, where you can choose neck and/or bridge pickups
Last edit: 10 Feb 2016 05:43 by RoGuE_StreaK.
- RoGuE_StreaK
-
- Offline
Less
More
- Posts: 486
10 Feb 2016 12:58 #42934
by RoGuE_StreaK
Replied by RoGuE_StreaK on topic Adding switches to devo 6s
Wait, I think I've f@#ked up with the trim wiring colours, hov-t really should end up as the right not the left, I need to investigate tomorrow
- Deal57
-
- Offline
Less
More
- Posts: 857
10 Feb 2016 16:49 - 10 Feb 2016 18:14 #42955
by Deal57
Deviation Devo7e 3way switch mod, A7105, NRF24L01
Devo6s 2x2 switch mod, trim mod, haptic, multimodule, A7105, NRF24L01, CC2500
Devo12e 4-in-1 with voice mod -- it speaks!!
Replied by Deal57 on topic Adding switches to devo 6s
I took my Devo6s apart and I can confirm that the switches and trims are correct in my installation and HOV-T is on the RIGHT side. However I got the photo labels wrong. I even coded my cabling for RIGHT=GREEN, LEFT=RED . EDIT: Also in re-reading your notes I found that the + and - on the RIGHT side (HOV-T) are reversed, as you noted. I've attached the correction here.
The P19 pad is correct: SWB (in my cable its the black wire) is the right-side 2-way switch, and SWA (the red wire) is the left side 2-way switch.
I'm pretty sure that this matches my button and switch test results. It's darn confusing...
Since I've got this apart, I'll hook up a 3-way on/off/on switch and see what I get.
Deviation Devo7e 3way switch mod, A7105, NRF24L01
Devo6s 2x2 switch mod, trim mod, haptic, multimodule, A7105, NRF24L01, CC2500
Devo12e 4-in-1 with voice mod -- it speaks!!
Last edit: 10 Feb 2016 18:14 by Deal57. Reason: Correct polarization of RIGHT Trim buttons
- RoGuE_StreaK
-
- Offline
Less
More
- Posts: 486
10 Feb 2016 21:13 #42963
by RoGuE_StreaK
Replied by RoGuE_StreaK on topic Adding switches to devo 6s
Yeah late last night I had a "relevation" (© The Good Dinosaur™) while trying to get a screaming baby to sleep, hence the abrupt message; this is the back of the PCB/front case, and when installing switches you are looking at the front of the rear case, so you need to remember that one or the other will be reversed! 
So SWB on the left pad and SWA on the right pad makes sense, as the left corresponds to the right side of the TX when facing it normally.
I forgot about this when doing my coloured wires, eg. had red/black/yellow on hov-t, which should end up on the right-hand shoulder, but put the switch with that colour wiring onto the left-hand shoulder, the same side as the pads when facing the PCB.
So, naming is sorted, let's lock it in, Eddie.

Deal57, have you updated your rcgroups pic so we have everything aligning everywhere? If so, I can easily rotate my trim to suit the +/- change, we just need to make sure everyone's on the same page from the beginning and it's documented. I should also try to change my PCB pic so the black marker is either swapped or not obvious
I blame it all on sleep deprivation
So SWB on the left pad and SWA on the right pad makes sense, as the left corresponds to the right side of the TX when facing it normally.
I forgot about this when doing my coloured wires, eg. had red/black/yellow on hov-t, which should end up on the right-hand shoulder, but put the switch with that colour wiring onto the left-hand shoulder, the same side as the pads when facing the PCB.
So, naming is sorted, let's lock it in, Eddie.
Deal57, have you updated your rcgroups pic so we have everything aligning everywhere? If so, I can easily rotate my trim to suit the +/- change, we just need to make sure everyone's on the same page from the beginning and it's documented. I should also try to change my PCB pic so the black marker is either swapped or not obvious
I blame it all on sleep deprivation
- Deal57
-
- Offline
Less
More
- Posts: 857
10 Feb 2016 22:05 #42967
by Deal57
 Been there, done that! It was well worth it for me, but hobbies kinda went away for a few (like 20!) years!
Thanks, I forgot to finish the RCGroups.com blog update but that's done now. I really like the way you built a single connector for your switches and buttons. Between the connector and higher gauge wiring, that's a lot of savings in space. I think I'll draw that out and use it.
Deviation Devo7e 3way switch mod, A7105, NRF24L01
Devo6s 2x2 switch mod, trim mod, haptic, multimodule, A7105, NRF24L01, CC2500
Devo12e 4-in-1 with voice mod -- it speaks!!
Replied by Deal57 on topic Adding switches to devo 6s
Thanks, I forgot to finish the RCGroups.com blog update but that's done now. I really like the way you built a single connector for your switches and buttons. Between the connector and higher gauge wiring, that's a lot of savings in space. I think I'll draw that out and use it.
Deviation Devo7e 3way switch mod, A7105, NRF24L01
Devo6s 2x2 switch mod, trim mod, haptic, multimodule, A7105, NRF24L01, CC2500
Devo12e 4-in-1 with voice mod -- it speaks!!
- RoGuE_StreaK
-
- Offline
Less
More
- Posts: 486
10 Feb 2016 23:40 #42970
by RoGuE_StreaK
 I'm persevering with the hobbies, but they are severely curtailed! A couple of bigger projects have had to go on hiatus.
RE: connectors, yeah, another case of best laid plans... I used right-angle double headers as that's the only doubles I had, made it twice as hard for myself by trying to solder closer to the plastic, no idea why I didn't trim the pins back first (nail clippers work well)... anyway, had the female hot-melted to the battery holder, turns out all that extra bulk of the right-angles doesn't allow the case to close, it hits the RF module! So I ripped it off and now it's just floating, but usable. I reckon if I were to redo it with cropped pins it may well fit, but don't know when/if I'll ever get around to it. Maybe if my next supply of trim toggles arrives as momentary like they are supposed to be, rather than latching like what arrived (basically a 3-way).
Replied by RoGuE_StreaK on topic Adding switches to devo 6s
RE: connectors, yeah, another case of best laid plans... I used right-angle double headers as that's the only doubles I had, made it twice as hard for myself by trying to solder closer to the plastic, no idea why I didn't trim the pins back first (nail clippers work well)... anyway, had the female hot-melted to the battery holder, turns out all that extra bulk of the right-angles doesn't allow the case to close, it hits the RF module!
Time to create page: 0.713 seconds
-
Home

-
Forum
-
General
-
General Discussions
- Adding switches to devo 6s